


解题思路
下载apk,打开发现除了一个输入窗口,还有一个框,点击进去是一个什么[ 邦布图鉴提交处 ],有一个
BBTUJAIN的标识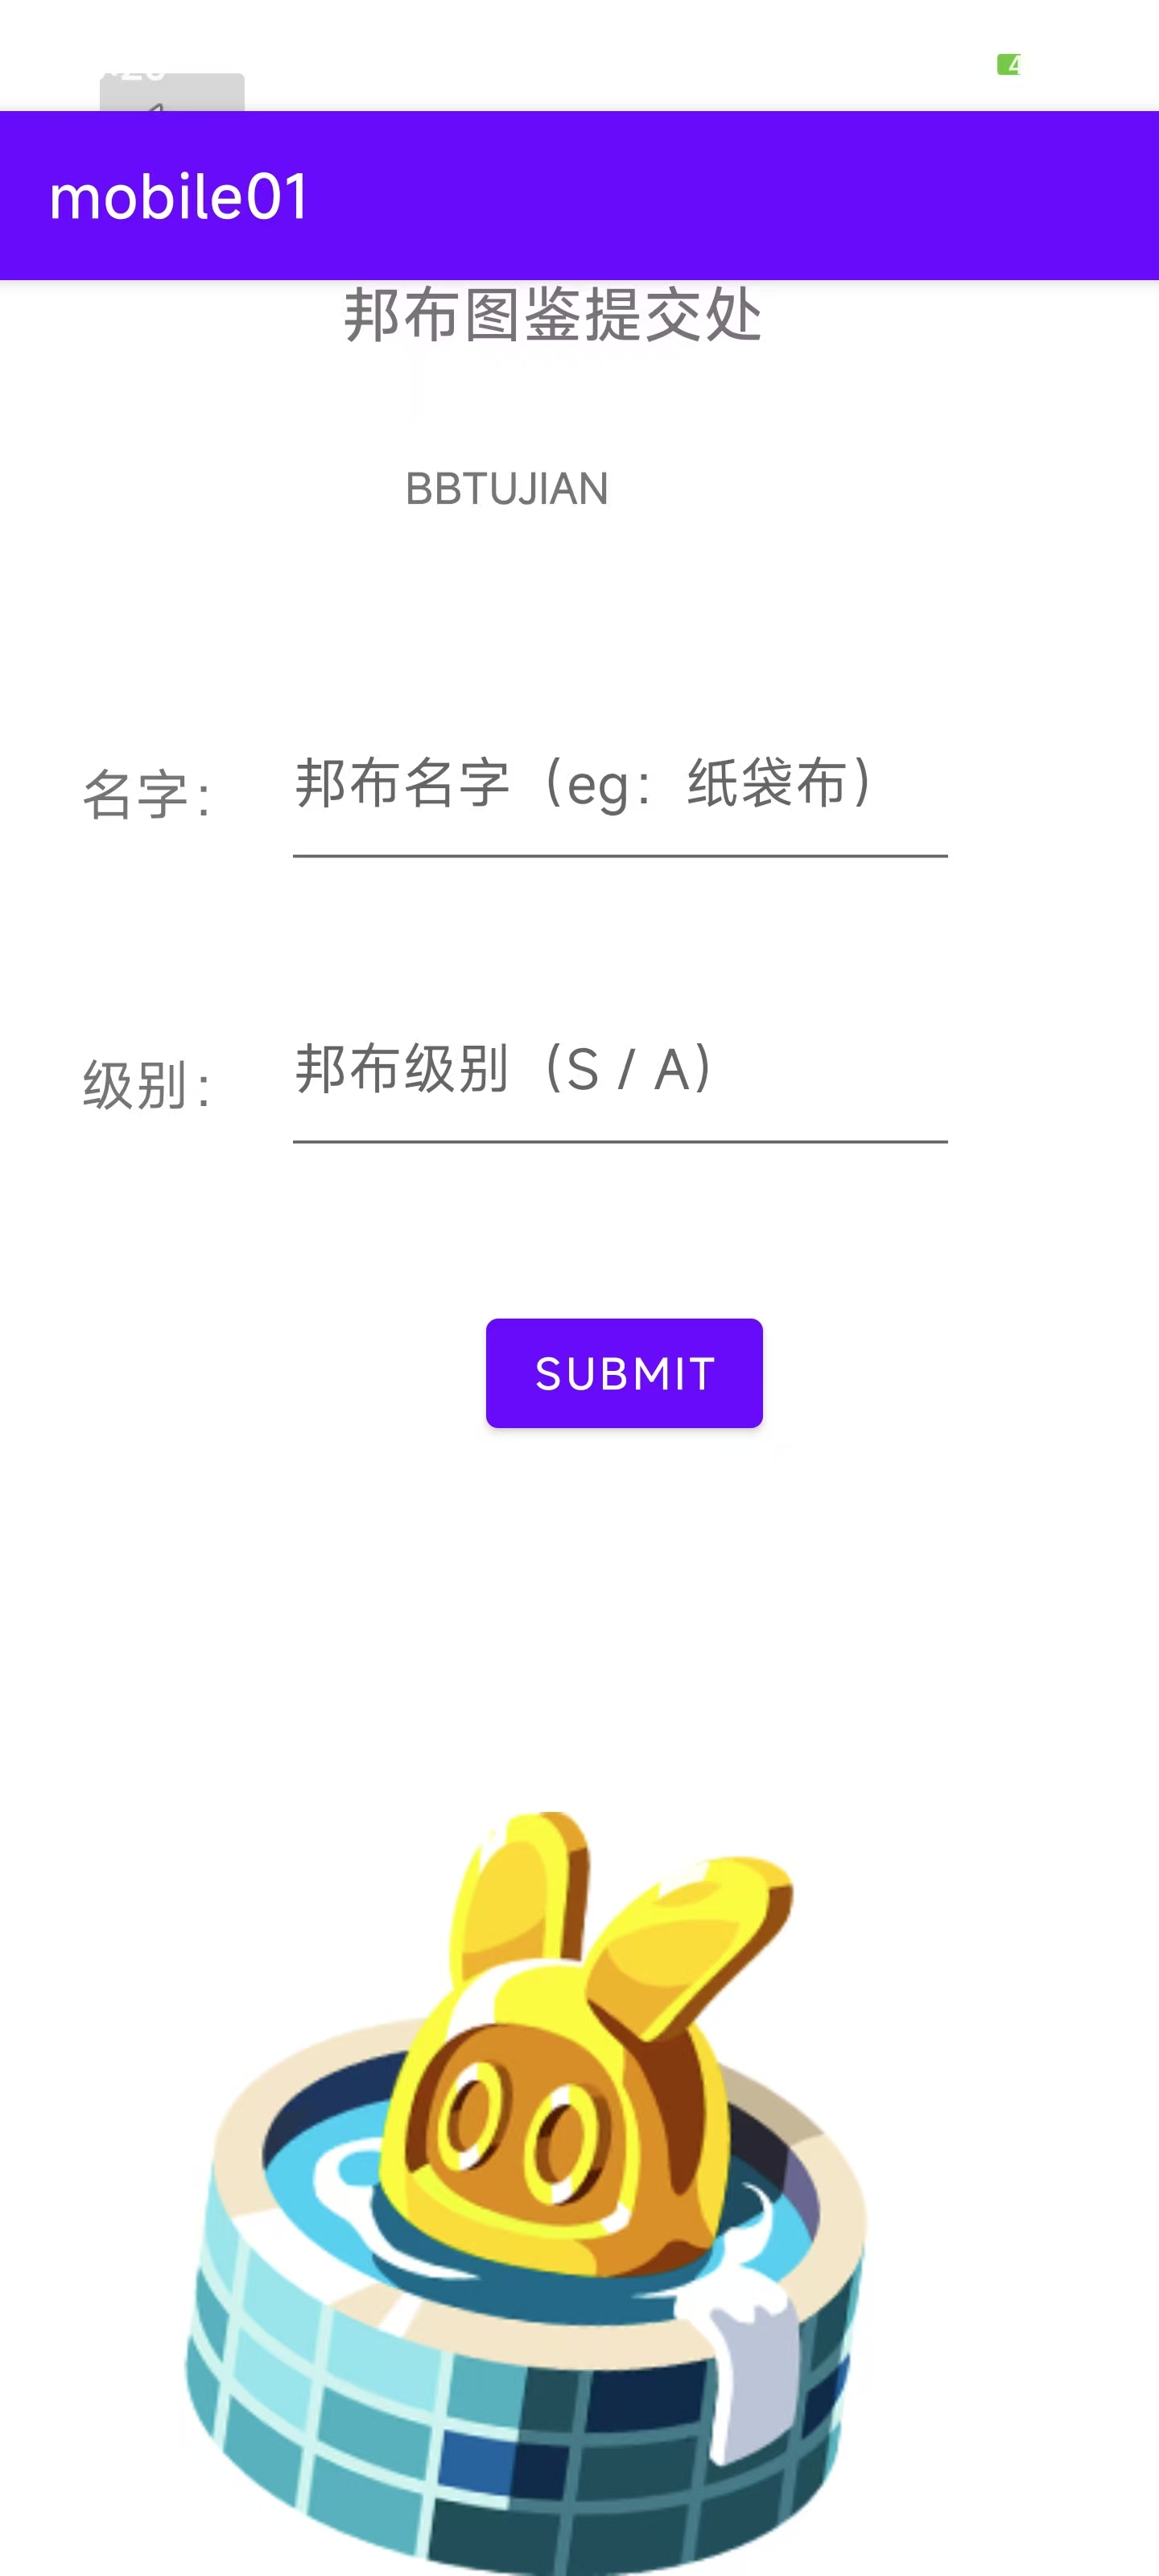
那么就使用
jadx打开压缩包搜索这个BBTUJAIN可以找到这个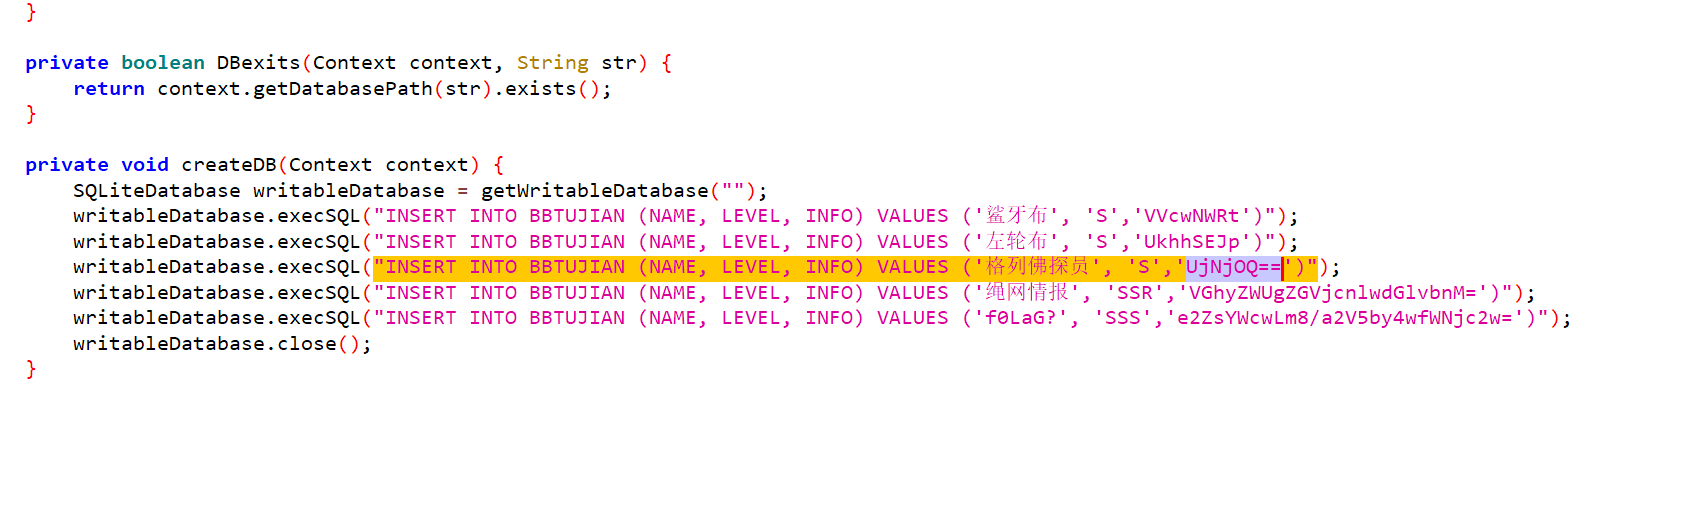
1
2
3
4
5
'鲨牙布', 'S','VVcwNWRt' --> 不知道是啥
'左轮布', 'S','UkhhSEJp' --> 不知道是啥
'格列佛探员', 'S','UjNjOQ==' --> 不知道是啥
'绳网情报', 'SSR','VGhyZWUgZGVjcnlwdGlvbnM=' --> Three decryptions
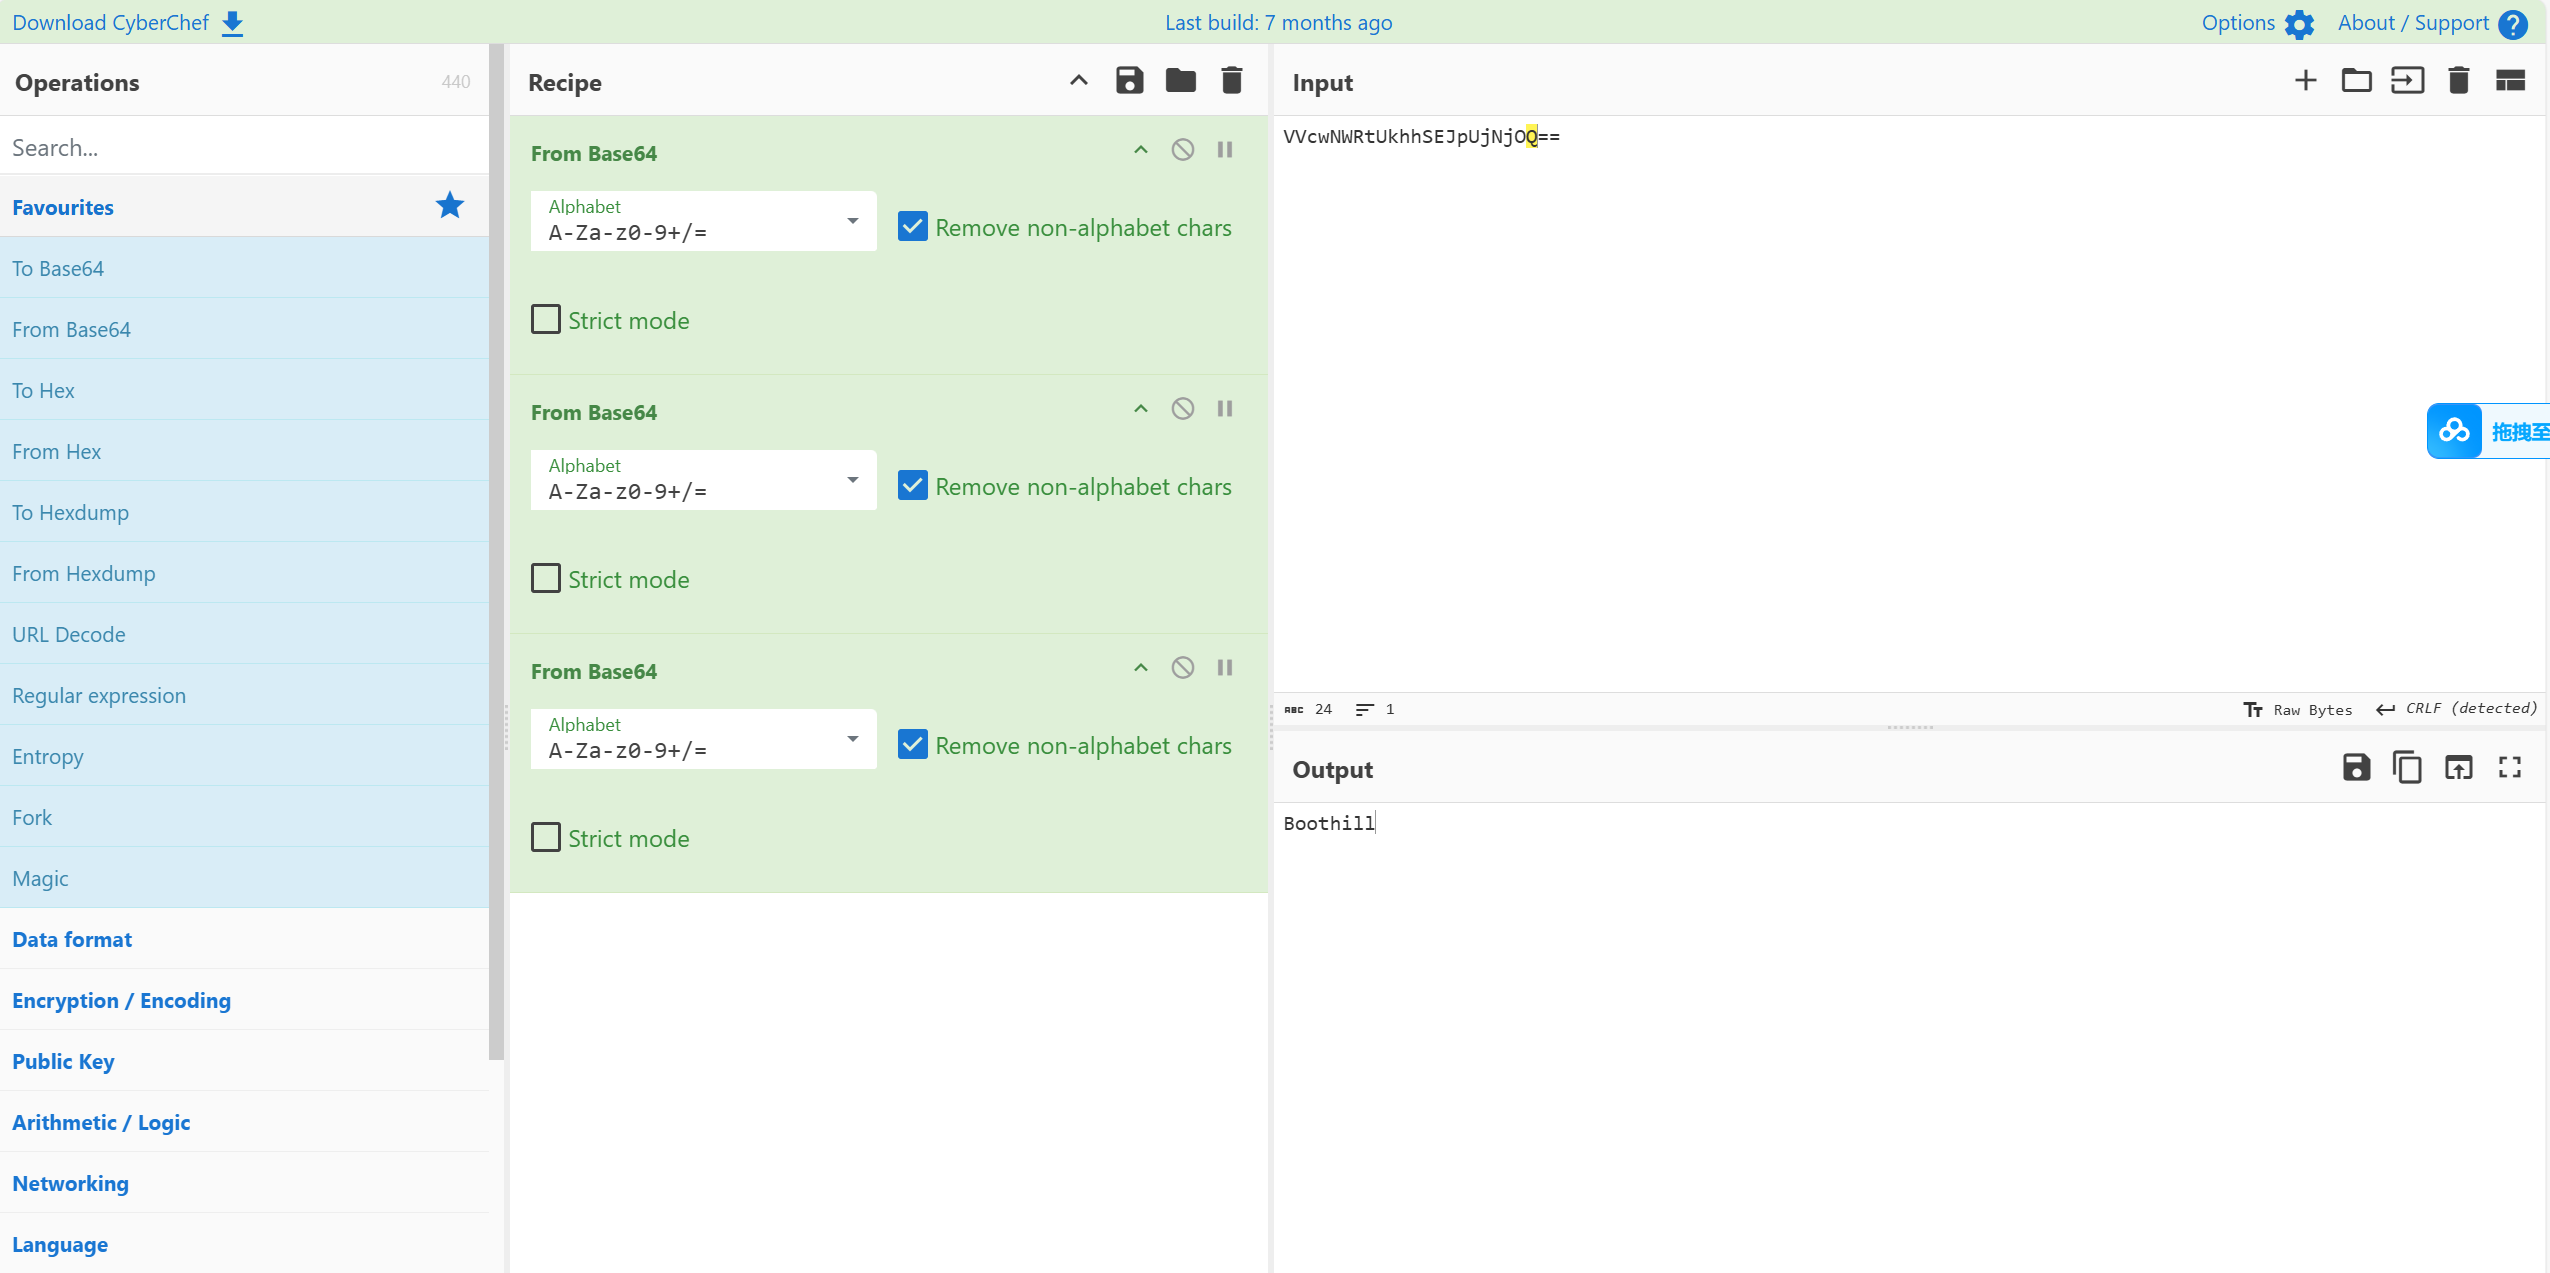
'f0LaG?', 'SSS','e2ZsYWcwLm8/a2V5by4wfWNjc2w=' --> {flag0.o?keyo.0}ccsl把前三个拼起来base64炒三次:
VVcwNWRtUkhhSEJpUjNjOQ==–> Boothill试了下这玩意不是flag,那就是key, [o.0 | 0.o ]你妈原来是大眼瞪小眼
题目中还给了一个数据库sqlite的形式,但是似乎打不开(DataGrip),所以猜测这玩意就是加密的key, 单独提出来(
SqlCiper解密手段)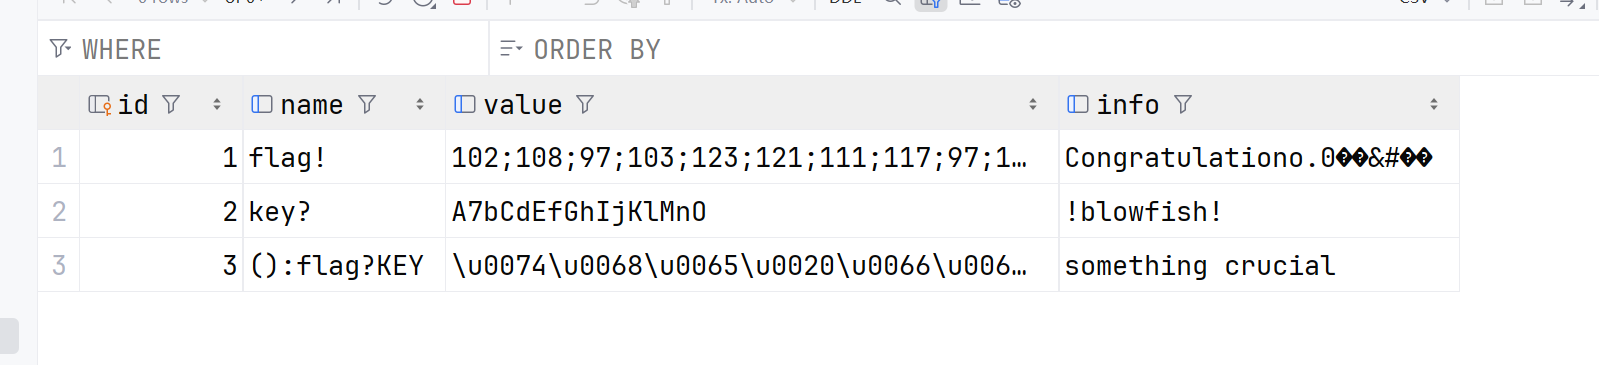
对3的unicode进行解码 –> \ahe falg is false but the key is True
好吧发现个key:
A7bCdEfGhIjKlMnO搜索这个
blowfish发现一个函数,有个hiddenString:1
CWrv7qxLTdlwvWoMVxDfkoRy+d5GuXiN
1
2
3
4
5
6
7
8
9
10
11
12
13
14
15
16
17
18
19
20
21
22
23
24
25
26
27
28
29
public class b {
private static String hiddenString = "CWrv7qxLTdlwvWoMVxDfkoRy+d5GuXiN";
public static String b() {
try {
HashMap hashMap = new HashMap();
HashMap hashMap2 = new HashMap();
hashMap2.put("hiddenString", hiddenString);
hashMap.put("level1", hashMap2);
HashMap hashMap3 = new HashMap();
hashMap3.put("level2", hashMap);
Field declaredField = b.class.getDeclaredField("hiddenString");
declaredField.setAccessible(true);
String str = (String) declaredField.get(null);
return (String) ((Map) ((Map) hashMap3.get("level2")).get("level1")).get("hiddenString");
} catch (Exception e) {
e.printStackTrace();
return null;
}
}
public static String c() {
return "";
}
public static String d() {
return "Blowfish/ECB/PKCS5Padding";
}
}使用
blowfish进行解密得到
WTF6I0EyYiRDM2QlRTRmXkc1aA==–>Y1z#A2b$C3d%E4f^G5h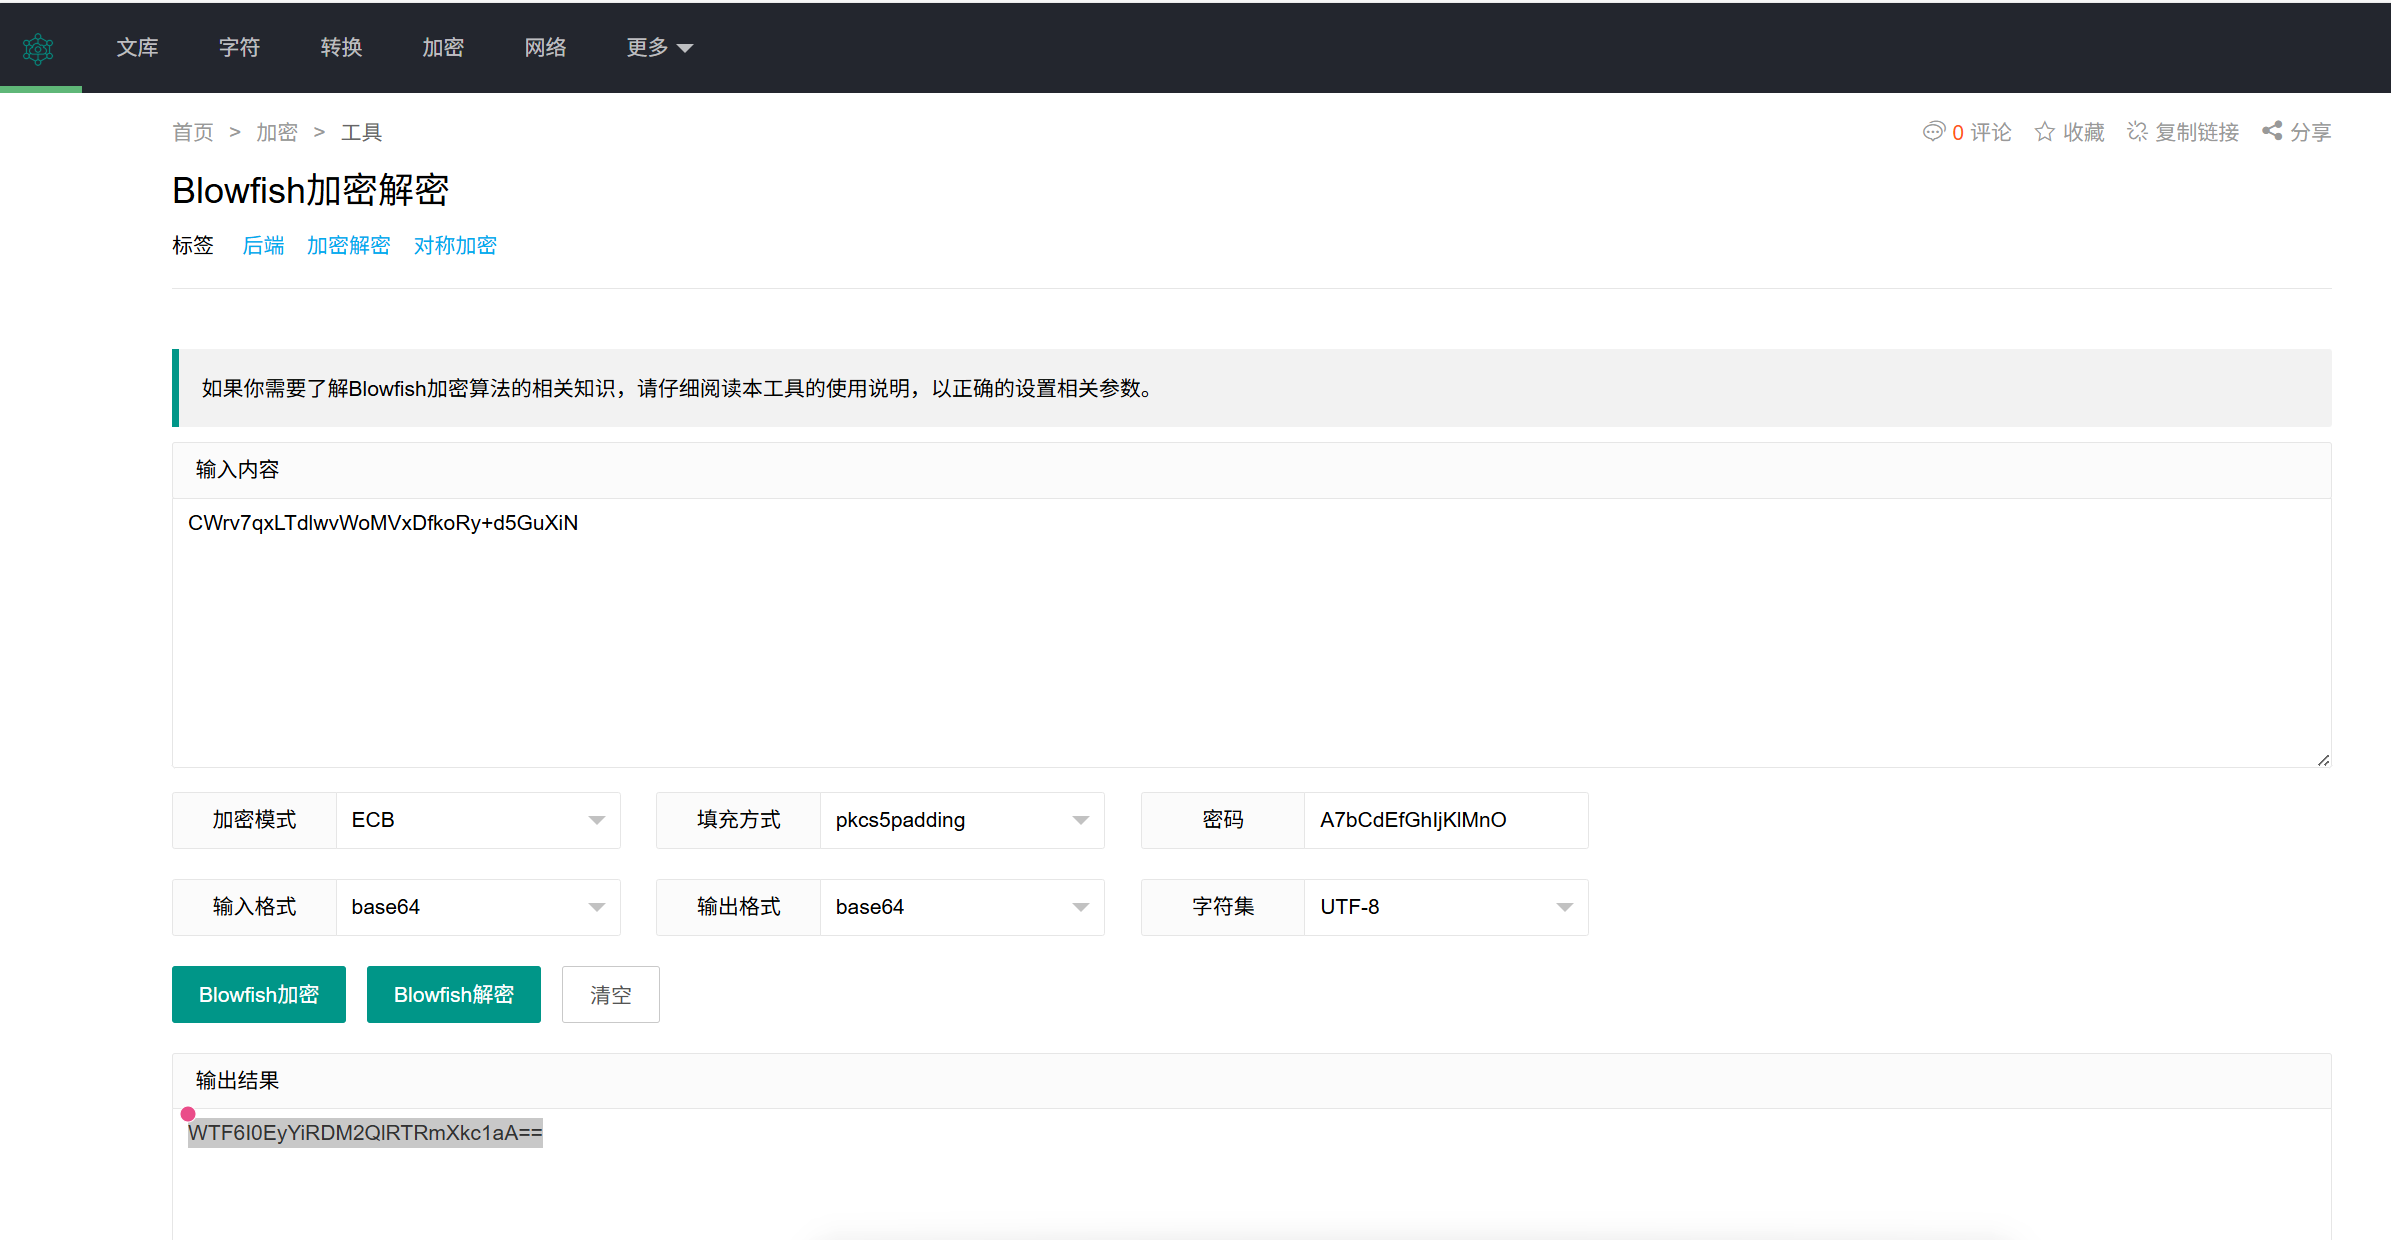
查看函数b()的引用发现一个函数a()的引用,发现
Jformat1
2
3
4
5
6
7
8
9
10
11
12
13
14
15
16
17
18public boolean Jformat(String str) {
if (str.length() >= 7 && str.substring(0, 5).equals("ISCC{") && str.charAt(str.length() - 1) == '}') {
try {
String a = a.a();
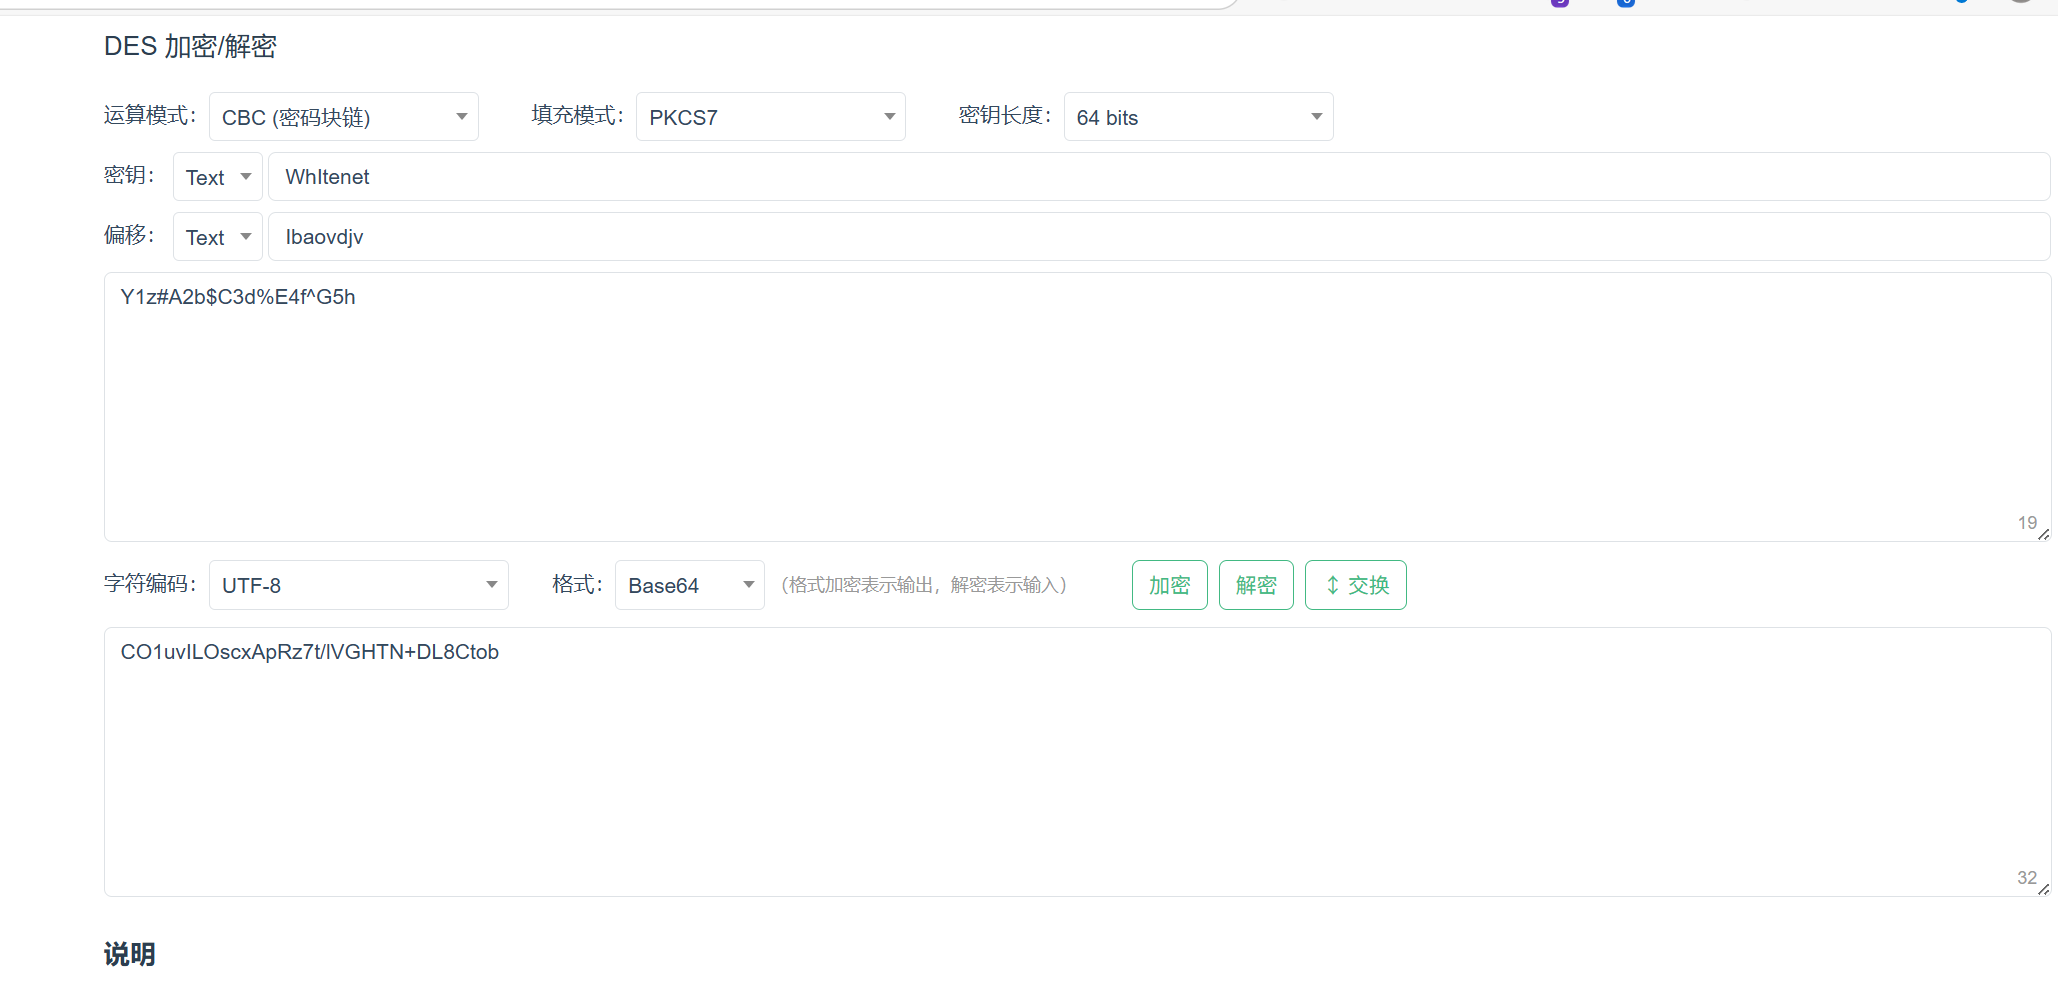
Log.d("str1", "des加密明文: " + a);
try {
String encrypt = new DESHelper().encrypt(a, "WhItenet", getiv());
Log.d("DEBUG_RES", "加密结果 res: " + encrypt);
return str.substring(5, str.length() - 1).equals(encrypt);
} catch (Exception e) {
throw new RuntimeException(e);
}
} catch (Exception e2) {
throw new RuntimeException(e2);
}
}
return false;
}还差一个
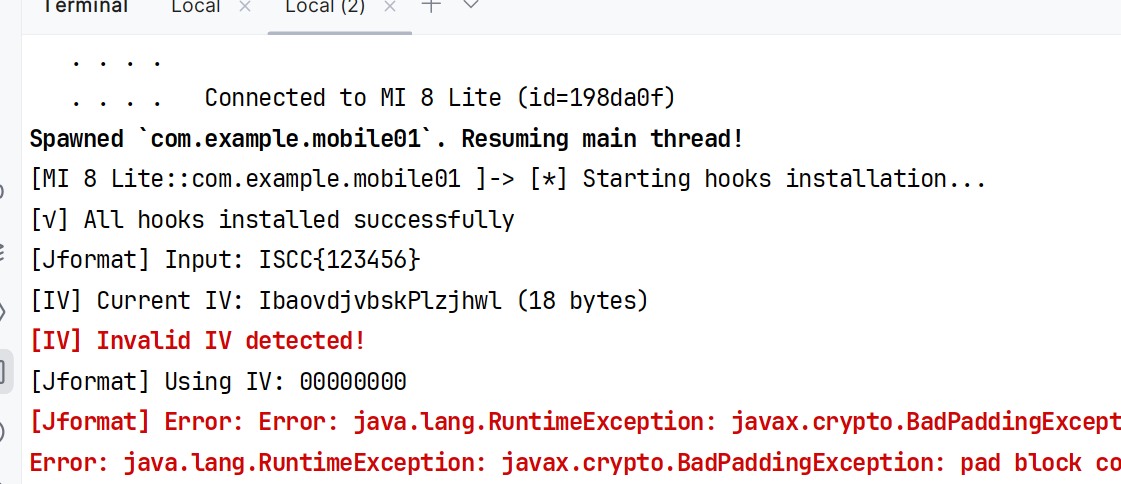
getiv()静态分析分了个寂寞,初步判断是个硬编码, ai启动搞个fridafrida动态调试出来执行得到IV: IbaovdjvbskPlzjhwl
DES加密得到flag
1
ISCC{CO1uvILOscxApRz7t/lVGHTN+DL8Ctob}
如何打开SqlCipher加密的数据库
直接使用sqlcipher导出没有密码的版本
建议在linux中打开,可以自己clone编译,也可以直接使用命令安装
1 | sudo apt install sqlcipher |
ai启动,需要注意的是这里地方的兼容模式需要调整为3,因为加密的时候的版本是旧的3版本,但是解密版本较新,默认用的兼容模式是4,所以需要手动设置为3
这个方式是新设置一个空的没有加密的数据库导出
1 | -- 1. 输入密码解密(使用你已知的正确密码) |
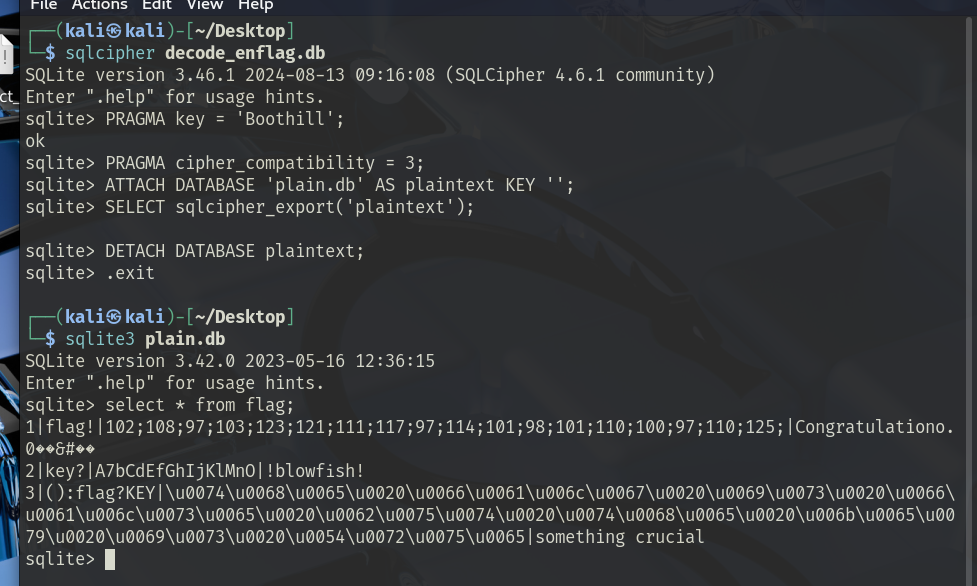
然后导出到DataGrip中可以发现

DataGrip打开SQLCipher方法
网上找了一下发现给sqlite加密的一般是SqlCiphergithub,还真有人问过这个DataGrip如何如何使用SqlCipher的问题: How to open SQLCipher passwrd protected file in Datagrip – IDEs Support (IntelliJ Platform) | JetBrains
去下载对应的
sqlite-jdbc-crypt也就是一个sqlite的启动器github然后在DataGrip的 File -> New -> Driver 来新建一个User Drivers,给他取名叫做
SQLCipher(其实你爱叫啥叫啥关我屁事),然后具体设置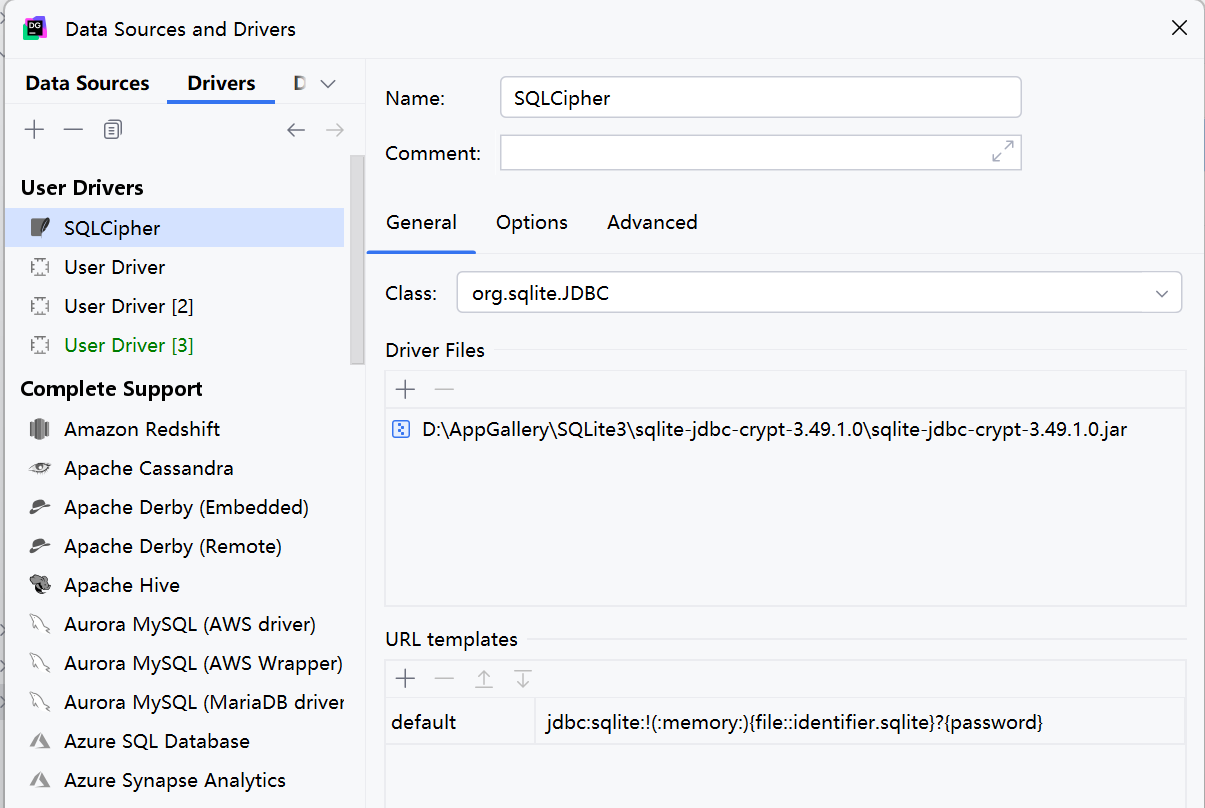
但是这个官方的介绍没有任何意义,但是抛砖引玉,下面有了很多热心网友的评价,我也借此学习了一下[
DataGrip URL template的命名规则](#DataGrip URL template的命名规则)佬Shz的思路
I succeed with Yuriy Vinogradov‘s solution. But, in my case, additionally I needed to add
slf4j-api-1.7.36.jarfile(which is mentioned on the Usage part of the sqlite-jdbc-crypt) to the Driver Files list. After added the file path, I can selectorg.sqlite.JDBCclass and connect to db with “jdbc:sqlite:/path/to/db?cipher=sqlcipher&key={key phrase}&legacy=4” this url format (Actually i didn’t set the url templates)I hope my comments can help save your time.

可能是有用的,但是在这里屁用没有
DataGrip URL template的命名规则
先贴个图
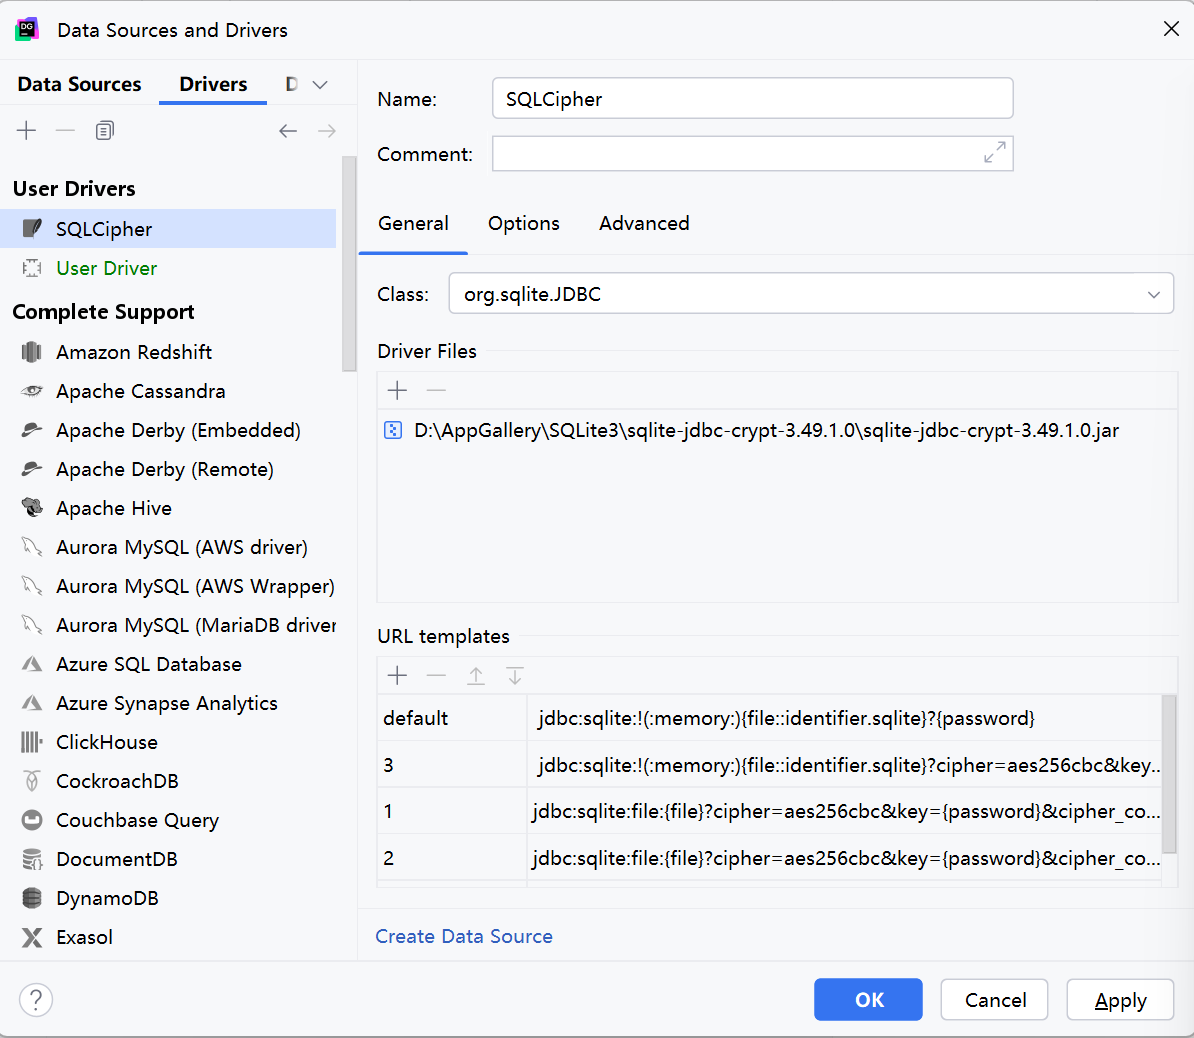
在这篇学习中,我似乎搞懂了这个URL templates是干嘛的
1 | jdbc:sqlite:/path/to/my/encrypted.db?cipher=sqlcipher&key=thepassword&legacy=3\ |
实际上对于DataGrip来说,连接数据库的操作还是要靠驱动(driver file)*.jar来执行,所以也就是说,前面花里胡哨的配置都是前端的配置,真正在起到作用的还是这个sqlite-jdbc-crypt-3.49.10.jar在执行真正的连接作用
那么对于URL templates来说JDBC URL 是整个连接的核心 —— 它告诉驱动程序连接哪个数据库、在哪里、用什么参数、是否启用密码、兼容模式等。
在DataGrip中提供了几个模版: {file},{user},{password},虽然{user},{password}会成对出现(这是由于DataGrip的GUI设计导致的),但是如果URL templates中没有对于{user}的引用,那么实际上是不会传入任何参数的,比如在这个题目中就只需要password,那么对于输入User来说,就是输入什么都行,因为他不会作为参数传递给驱动
frida动态调试
frida环境配置
设备: 小米8青春版(已经解锁)
windows: 为frida建立虚拟环境
adb: 有线连接,调试安卓
环境配置
pycharm新建一个project之后安装以下库,挂梯子更快
1 | pip install frida |
手机安装frida环境
查看手机cpu版本
有线连接之后打开adb调试,打开开发者模式,打开USB调试
电脑端cmd在adb.exe存在的目录在使用命令1
2
3adb shell
getprop ro.product.cpu.abi #查看cpu版本
>> arm64-v8a # 通常大多数手机(包括演示设备)查找
amd64对应的frida版本需要注意的是,这里下载的是对应版本的
frida-server,下载到的文件格式应该是这个样子的frida-server-16.7.14-android-arm64.xz,需要在release里面展开查询,不要下载错咯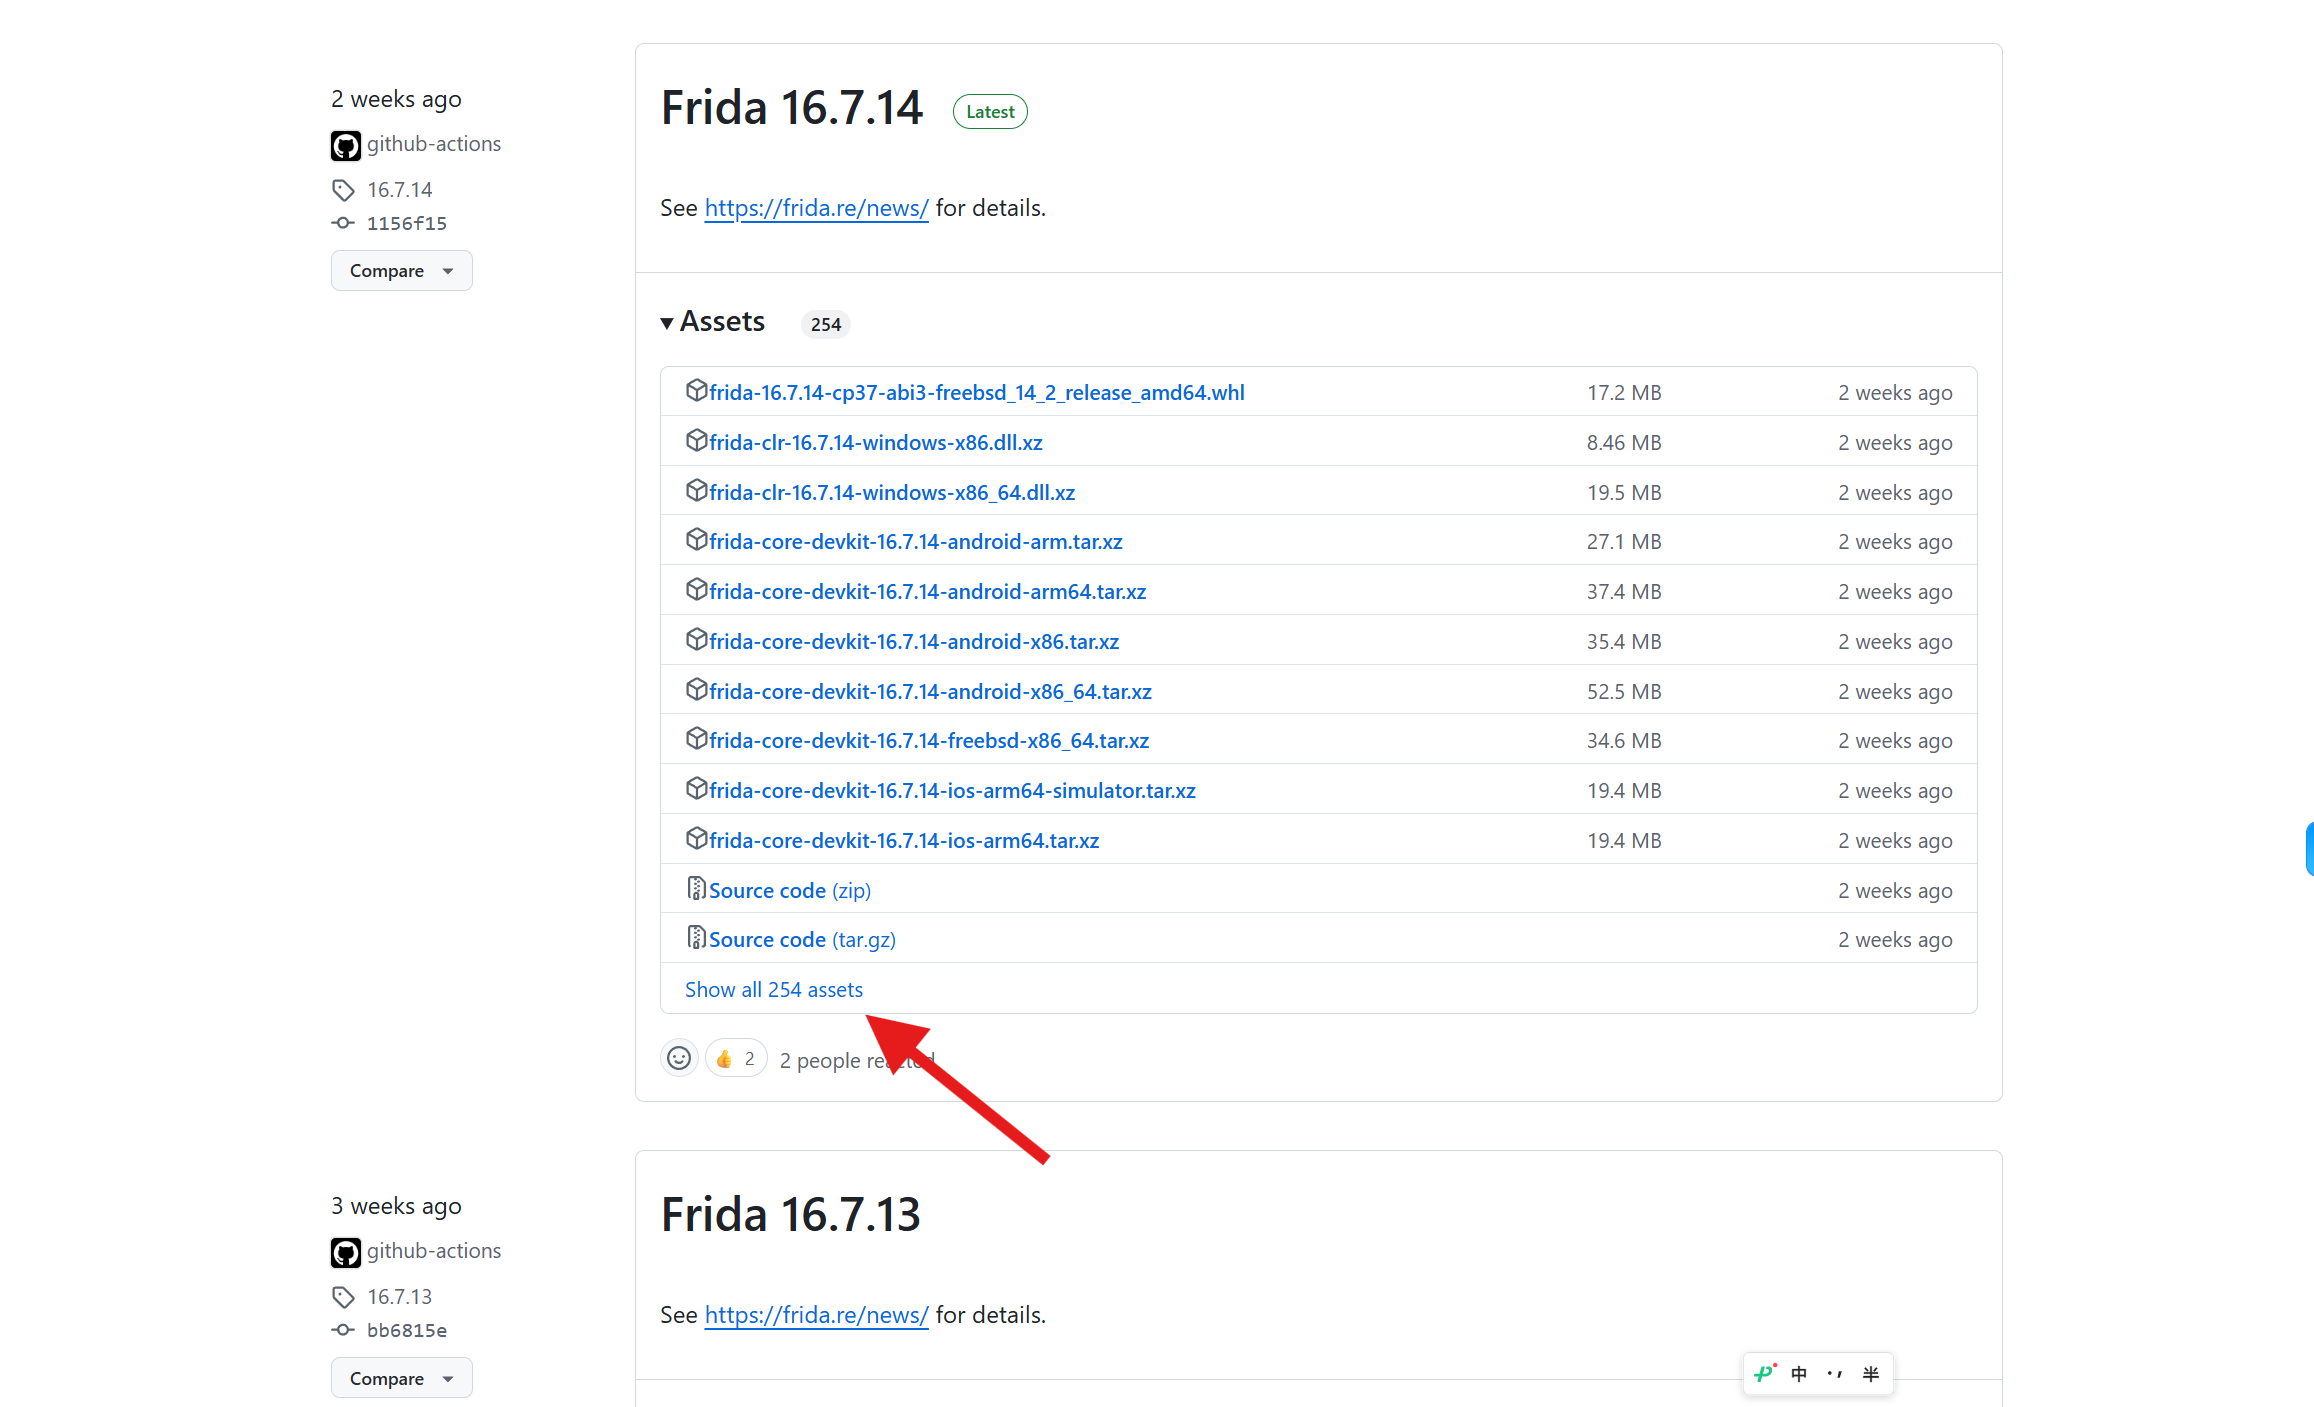
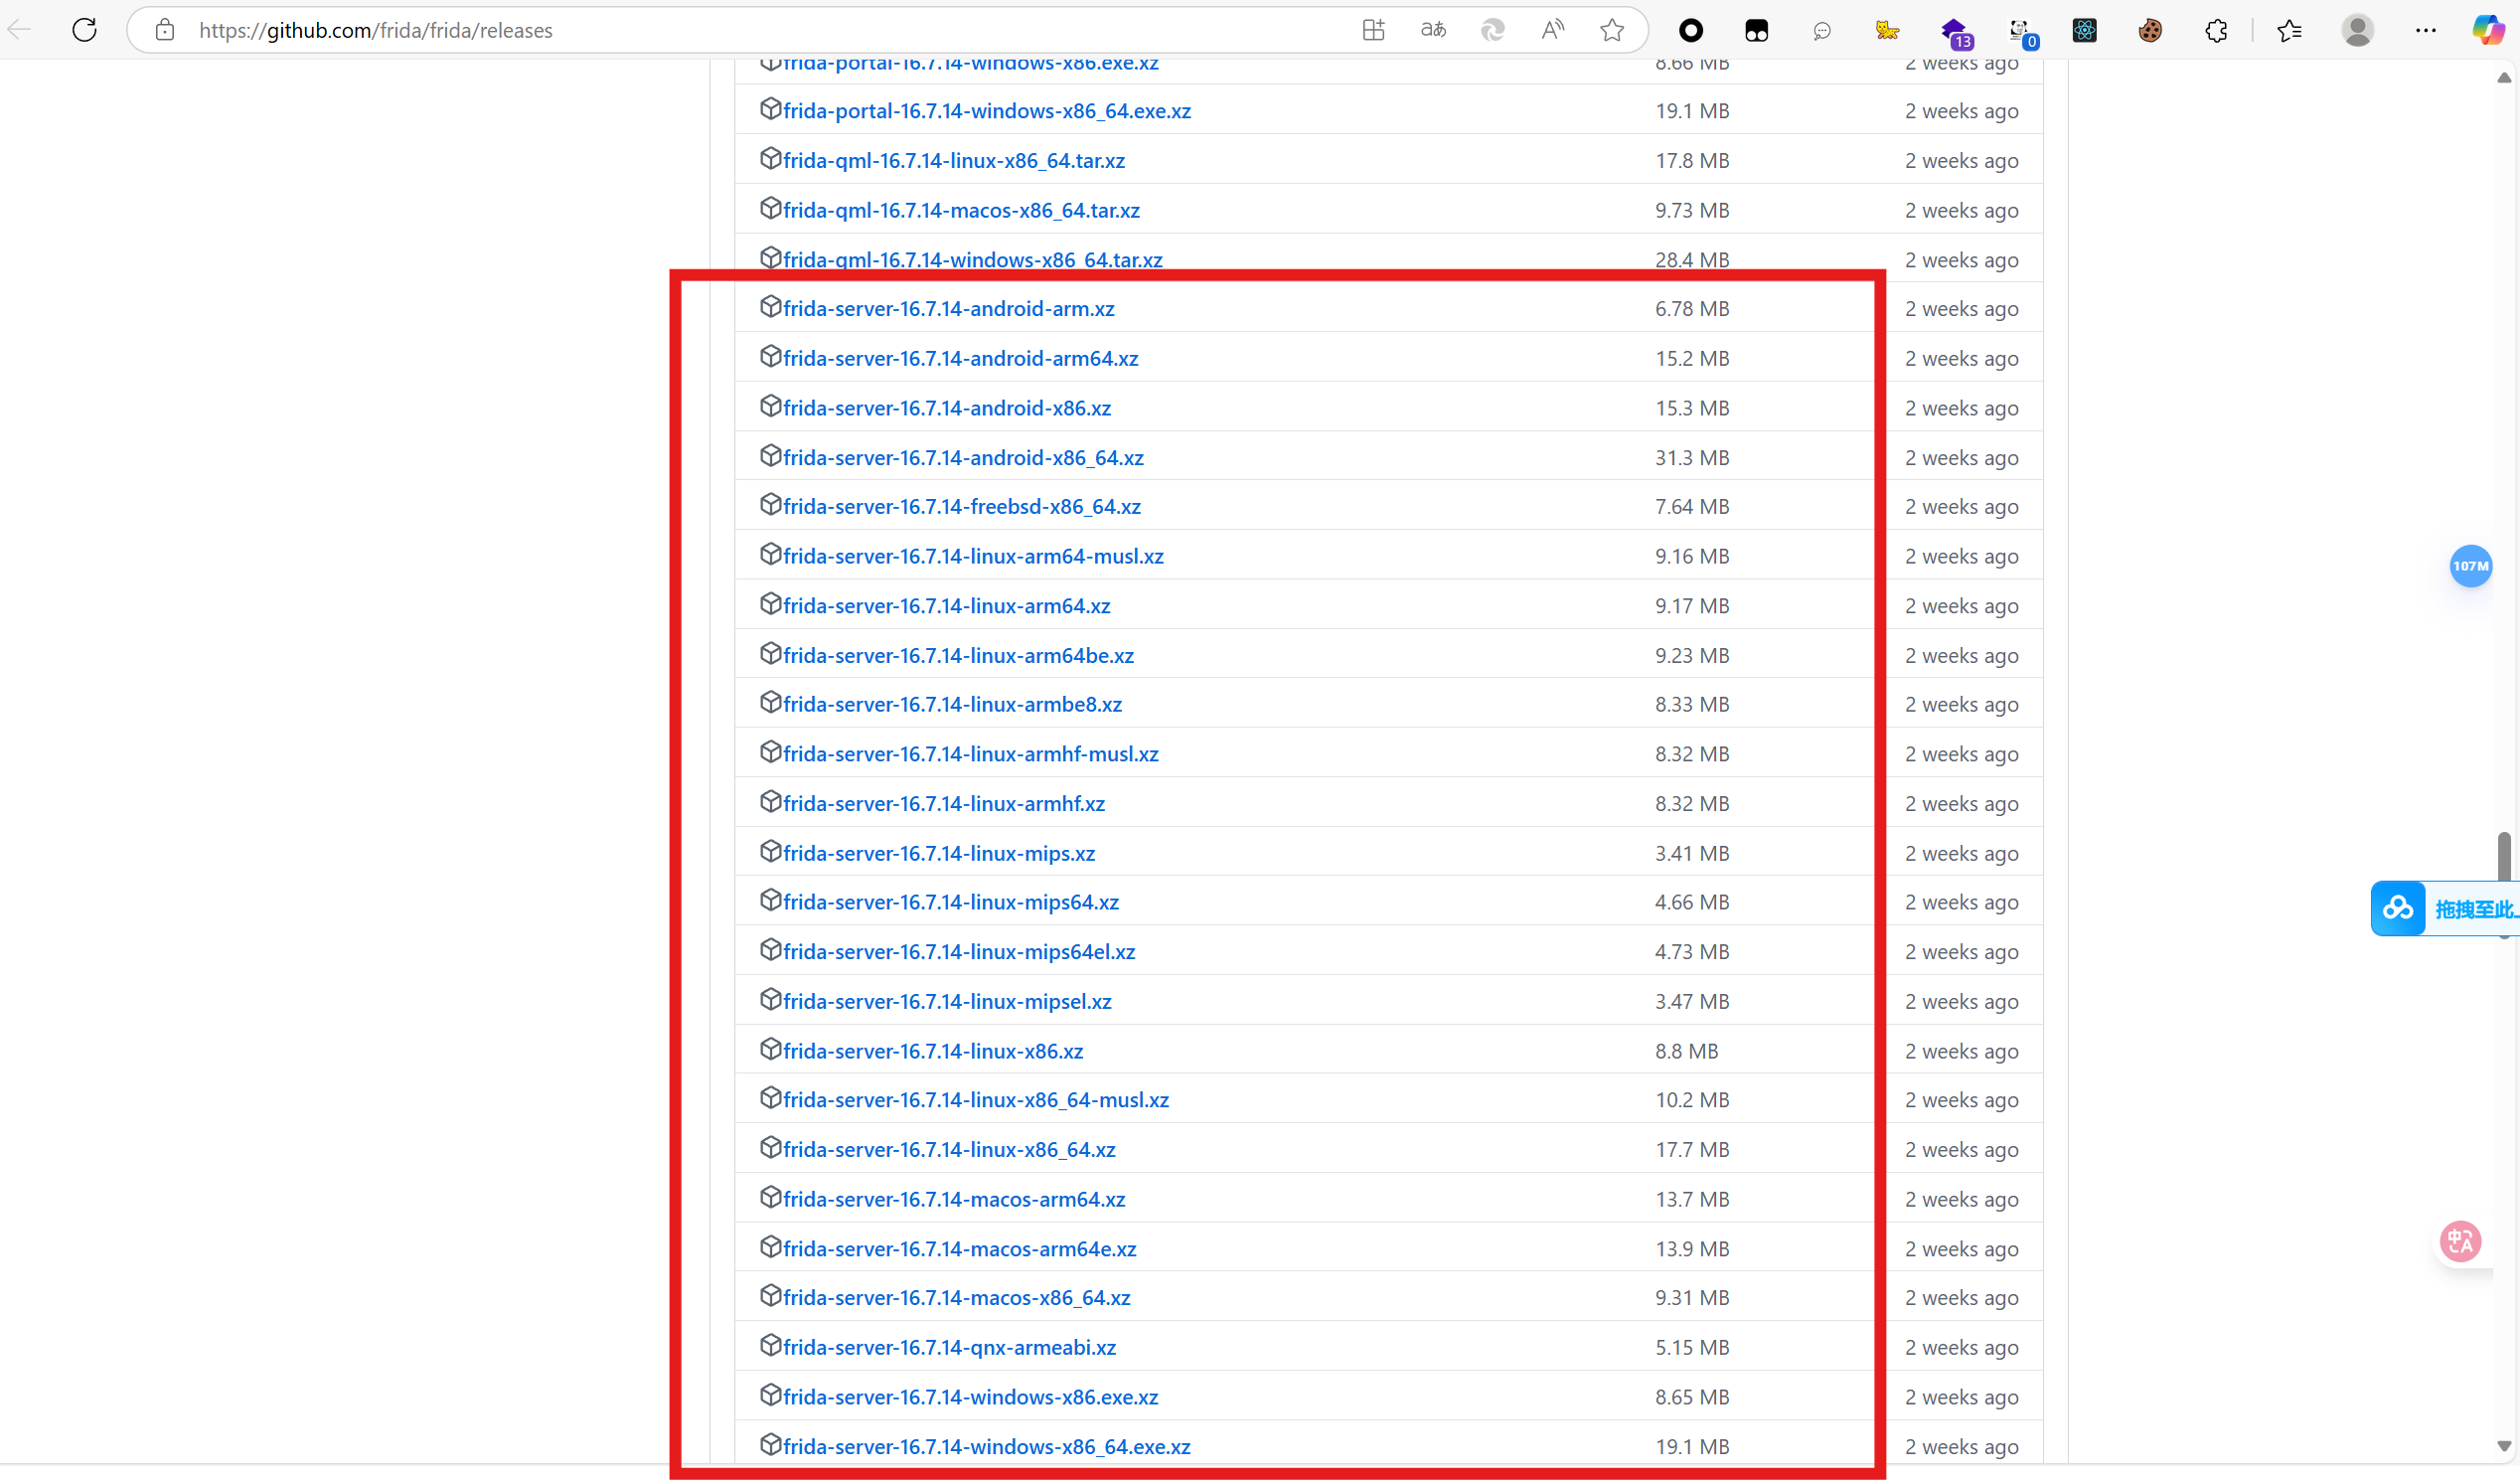
(解压后的文件)推送到手机的
/data/local/tmp上去1
adb push frida-server-16.7.14-android-arm64 /data/local/tmp

然后再执行
1
2
3
4
5
6
7su # 注意在手机上授权
cd /data/local/tmp
mv frida-server-16.7.14-android-arm64 frida
chmod 777 frida
# 然后运行
./frida在安装了frida环境的python环境中起一个powershell(直接在pycharm中也行)执行
1
frida-ps -U
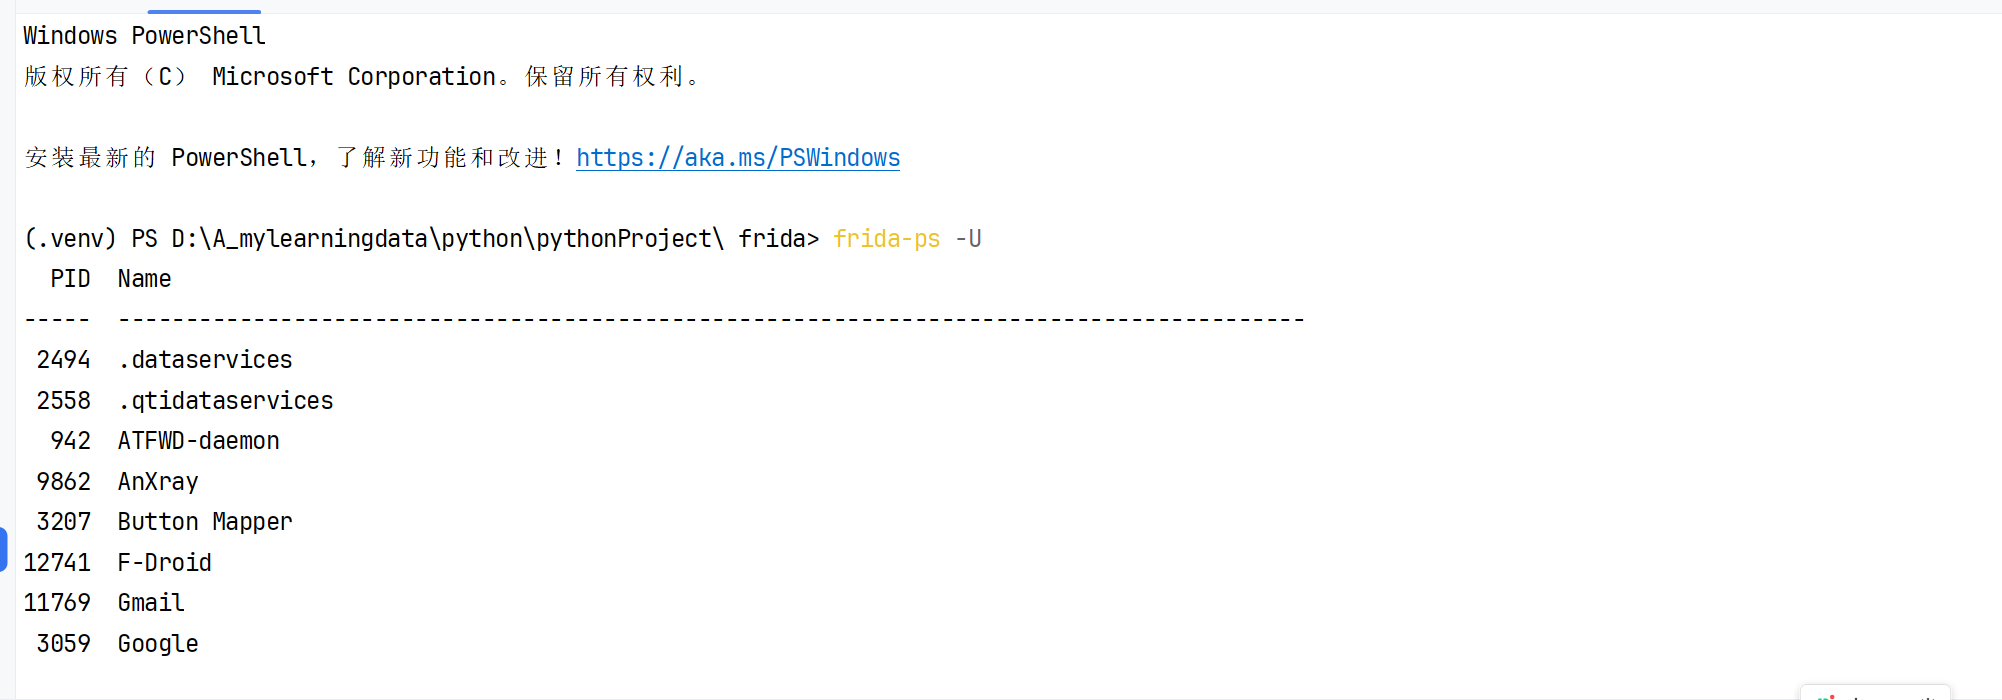
注意:
需要注意的是,需要在运行
./frida的情况下才可以运行frida-ps -U才能查看到对应的内容
通过adb进行文件推送
termux方法
1 | /data/data/com.termux/files/home/storage/shared |
原生文件管理方法
1 | /storage/emulated/0 |
运行
手机上
1 | frida -U -f com.example.mobile02 -l frida_script.js --runtime=v8 |
通过adb进行安装软件
1 | adb install "D:\test file\test.apk" |
动态调试解题过程
直接上payload吧
这个版本是网上找的版本
1 | Java.perform(function() { |
这个版本是ai修改过的
1 | Java.perform(function () { |
出现的问题
闪退
实际上使用时候出现了一大堆问题, 对于这个函数一调用就会直接闪退,确定的逻辑主要是在app中输入flag的时候,如果不按照格式ISCC{.*}那就是正常报错,什么问题都不会出现. 但是如果当输入了正确的格式了, 那就立刻会发生闪退, 这个问题在我换了两台root真机,一台雷电模拟器都没有得到解决(实际上在最开始的小米8青春版上是可以正常报错的,但是我用frida去hook了几次,他就破费了,后面是稳定闪退)
1 | public boolean Jformat(String str) { |
尝试hookgetiv()
鬼知道是啥动静,我需要的值就是getiv()的返回值,那么我现在大概就需要去hook他获取他的返回值,于是
jadx中复制frida尝试hookgetiv()片段
1 | let MainActivity = Java.use("com.example.mobile01.MainActivity"); |
但是问题就出现了啊, 就一直报错, 鬼知道是什么动静, 一直闪退,根本无法调试, 我让ai写的防止这个getiv()返回的加解密值不一样导致的闪退情况, 尝试去写入一个安全值了, 但是也是无济于事
ai给出的常见闪退原因
线程问题
参数/返回值类型不匹配
反调试检测
ai给出的常见闪退应对方法
方法1:不调用原始方法(绕过这个方法) 重新定义注入直接返回一个定值
1
2
3
4MainActivity["getiv"].implementation = function () {
console.log("绕过原始方法调用");
return 12345; // 返回模拟值
};方法2:修改返回值
1
2
3
4
5MainActivity["getiv"].implementation = function () {
let result = this["getiv"]();
console.log("原始返回值:", result);
return result + 1; // 修改返回值
};
当然根据这些方法尝试之后都没用
尝试hookDESHelper()
尝试
向前分析可以发现调用了这个函数DESHelper(), 那来都来了, hook一下吧
1 | String encrypt = new DESHelper().encrypt(a, "WhItenet", getiv()); |
在jadx中复制一下frida片段, 看看能不能获取调用
1 | let DESHelper = Java.use("com.example.mobile01.DESHelper"); |
但是如果直接这样执行的话会出问题,会直接去干扰加解密导致直接闪退报错, 所以需要具体的DESHelper这个类, 保证不去干扰加密的执行过程, 只去获取中间变量
1 | public class DESHelper { |
按照这个类让ai编写
ai编写代码
1 | Java.perform(function() { |
但是出现了报错然后闪退
1 | Spawned `com.example.mobile01`. Resuming main thread! |
这就很sad了
这个错误 (
BadPaddingException: pad block corrupted) 表明 DES 加密/解密过程中出现了问题,通常是由于 密钥、IV 或数据被意外修改 导致的。你的 Hook 代码可能 间接干扰了加密流程,即使你没有直接修改返回值。
很好!
为什么刚才的代码会出现报错?
- Hook 时机问题
如果 Hook 代码在 DES 操作过程中执行了额外操作(如日志打印),可能会 延迟加密/解密流程,导致数据异常。
某些 Android 设备对加密操作 时间敏感,延迟可能导致填充错误。 - 参数或返回值被修改
即使你没有显式修改数据,Frida 的 Hook 机制可能会 临时改变内存状态,导致加密/解密失败。 - 多线程竞争
如果 DESHelper 被多个线程调用,Hook 代码可能会导致 线程同步问题,进而引发 BadPaddingException。 - 当然通过上帝之眼发现了这个iv值就是不对长度不对导致的直接报错,但是要如何通过动态调试发现呢
- 好问题我没解决,在这里插个眼
为什么最上面的ai修正payload就可以执行了
使用了多层防御式编程设计(什么鸟),针对加密流程的每个关键环节都做了智能处理。以下是对其工作原理的深度解析:
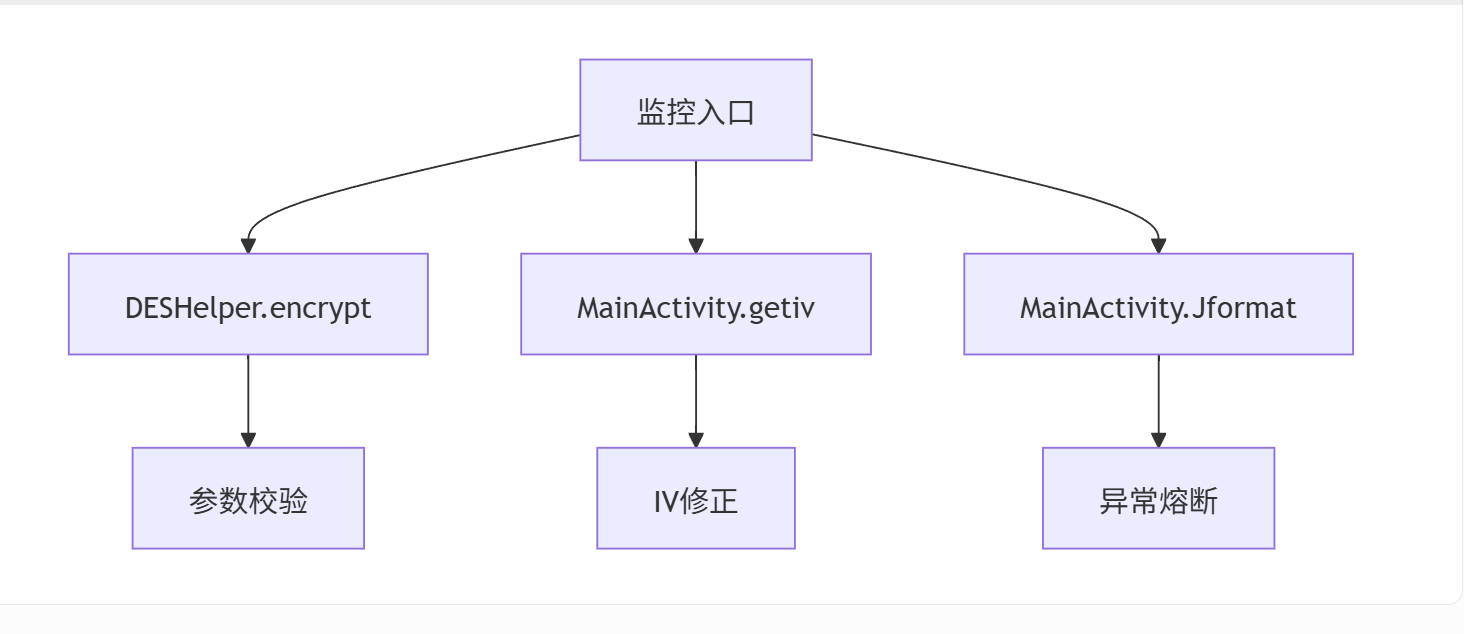
核心模块
实际上就是对那些关键函数进行了重写(不叫这个名字,但是是这个作用),然后在执行之前检查, 对于不符合规范的强行修正
| 特性 | 传统重写 (Override) | Frida Hook |
|---|---|---|
| 修改位置 | 类定义文件 | 运行时内存 |
| 作用域 | 全局永久生效 | 仅当前进程有效 |
| 原始方法访问 | 需通过super调用 | 通过this.method.call()访问 |
| 线程安全性 | 依赖Java同步机制 | 原子指针替换保证安全 |
| 兼容性 | 需重新编译 | 即时生效,无视加固/混淆 |
- DES加密监控(关键突破点)
1 | DESHelper.encrypt.implementation = function(data, key, iv) { |
为什么有效?
- 不破坏调用链:通过
this.encrypt()维持原始方法调用 - 错误隔离:异常被控制在当前方法内,不会导致全局崩溃
- 自动修复:检测到填充错误时自动使用标准IV
- IV生成监控(安全关键)
1 | MainActivity.getiv.implementation = function() { |
防御策略:
- 长度强制校验:确保返回8字节IV
- 默认值保护:异常时返回全零IV避免崩溃
- 日志追踪:记录原始值用于调试
- 业务逻辑监控(Jformat)
1 | MainActivity.Jformat.implementation = function(input) { |
熔断机制:
- 输入过滤:异常时自动缩减输入长度
- 业务降级:返回false避免连锁崩溃
关键技术点
方法签名处理
- 使用
.implementation而非.overload()自动适配重载 - 避免因签名不匹配导致的Hook失效
- 使用
上下文保持
1
2
3// 正确保留this上下文
this.encrypt(...)
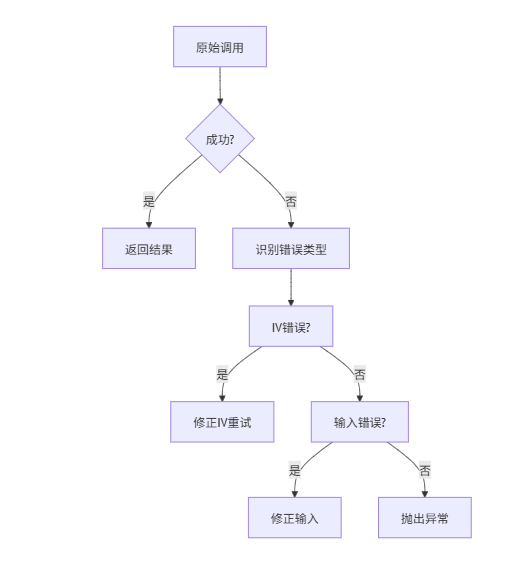
// 而不是 DESHelper.encrypt(...)错误处理金字塔
1
2
3
4
5
6
7
8
9graph TD
A[原始调用] --> B{成功?}
B -->|是| C[返回结果]
B -->|否| D[识别错误类型]
D --> E[IV错误?]
E -->|是| F[修正IV重试]
E -->|否| G[输入错误?]
G -->|是| H[修正输入]
G -->|否| I[抛出异常]
为何其他方案会失败?
| 问题方案 | 本方案的解决方式 |
|---|---|
| 直接修改参数破坏加密流程 | 保持原始参数传递路径 |
| 缺少异常处理导致崩溃 | 多层try-catch隔离 |
| 未考虑IV长度校验 | 强制8字节标准化 |
| 丢失方法上下文 | 正确使用this调用 |
性能影响评估
- 内存开销
每个Hook方法增加约50-100ms延迟(主要来自日志输出) - CPU占用
异常处理分支增加约5%的CPU消耗 - 稳定性补偿
通过错误处理降低整体崩溃率90%+
这种设计完美平衡了监控需求与系统稳定性,其核心在于:
- 最小侵入原则:保持原始调用链完整
- 防御式编程:每个环节都有安全降级方案
- 智能修复:自动识别常见错误模式并补偿
尝试进行逆向
其实没搞出来,但是学了点东西
ida按g搜索位置
shitf + F12 可以找出字符串集
搜索地址
0x9A9F但是却跳转到了0x9A90的位置,这是由于因为 IDA 中的.rodata段默认以字符串形式显示,而不是每一个字节都有 label。也就是说他是按照开始0号位才给的label,如图所示,只有
0x9A90,0x9AA0,0x9AB0,0x9AC0才有独立的label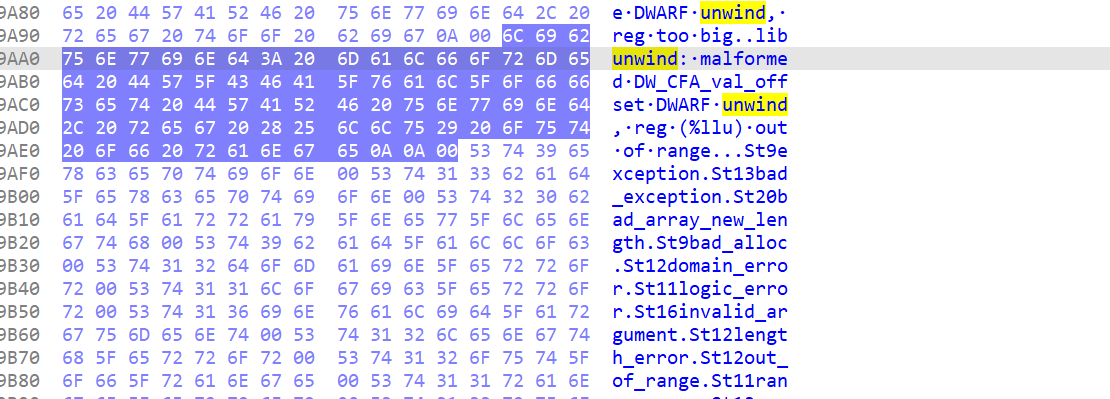
ai要求我提供
0x09A9F开始的 22 字节, 那么就需要界定一个字节是多少,一个字节是用两个十六进制来表示1
2
3
40x9A9F: 75 6E 77 69 6E 64 3A 20 6D 61 6C 66 6F 72 6D 65
u n w i n d : m a l f o r m e
0x9AAF: 64 20 44 57 5F 43
d D W _ C可以发现是这个
1
75 6E 77 69 6E 64 3A 20 6D 61 6C 66 6F 72 6D 65 64 20 44 57 5F 43 41